Hey everyone, thanks for tuning in. For those that may be new here my name is Jazzie and I’m an prospective pentester/ hacker currently working as an analyst in cybersecurity.
I started a 12 week penetration testing / ethical hacking course three days ago now (yes I’m behind on blog posts lololol) and each day I’m supposed to write a summary of what I worked on! So let’s get started!
Today’s Objectives:
- Finishing up basic commands
- Seeing what we find with ls -la
- Reading everything we find
- Taking a look at what RWX really means
- Adding Users

Basic Commands Continued
- chmod – change mode
- adduser – adds a user
- cat /etc/shadow – passwords and hashes
- su – switch user
- sudo – superuser do
- -c – count
- arp -a – examines and allows us to manipulate arp cache
- netstat -ano – shows you all ports that are open and everything those ports are connected to
- route – shows touting table
- ifconfig – shows IP address
- iwconfig – for wireless configurations
- ping – test reachability of a host
What’s Up With LS -LA?
Well we know from day one that ls means list and now we know after hitting return on ls -la that it means show me everything…hidden files…we want those too.
Take a look…let’s discuss this one photo for a few moments yeah??

Next up…what’s with the blue?
How kind of them to point it out to us. Simply but a directory is like a desktop folder. You can put stuff in it and with that same “ls” command we discussed earlier we can see what’s within that directory … imagine if we added an “ls -la” ….
also to note … it isn’t shown here but if something was green that would mean it was executable but we’ll discuss that in a few…
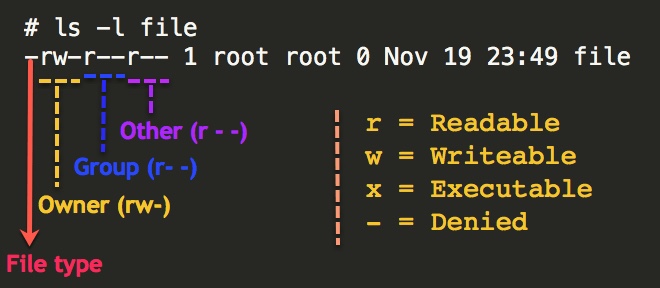
“-“ means in front means it’s a file.
Now let’s look at the first column…
Let’s start with the very first line…drwxr-xr-x
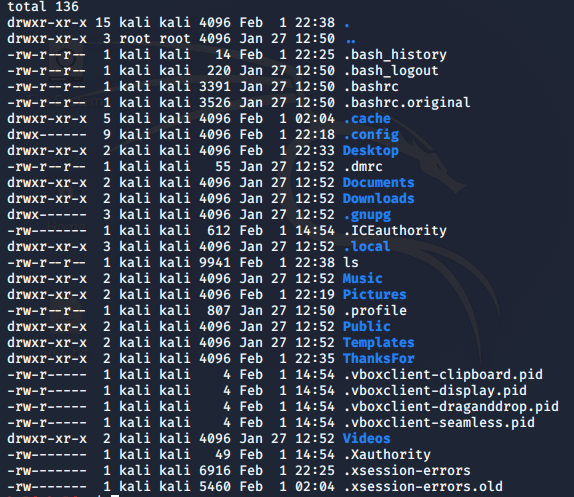
Well right off the bat we know that this is a hidden directory because it’s blue and we see a dot!
And if we didn’t know it was a directory the d at the beginning of drwxr-xr-x would have told us that.
You guessed it d = directory as well
Read, Write, Execute = RWX
Next to that d we see rwx and some other things…dashes…why? What’s that mean?
Well this column is broken down into three parts which specify permissions & owners. In other words it says who can do what.
I like this photo to explain this concept!
Adding Users
Last but not least we went over how to add users. Incredibly simple … let’s take a look at the gif I made below…

To Close
Day two was a success! Now that I know sudo is necessary for this new version of Kali – everything has been a piece of cake.
Day 3 we build a ping sweeper along with doing other things BUT CLEARLY I am most excited about the ping sweeper! Woot woot.
As Always
Thanks for taking a byte with me today!
Thank you for all of the new followers!
Thank you for all of the support!
Thank you for purchasing anything you may have purchased.
Thank you for retweets, love, and encouragement.
You guys are amazing!
Connect with me
Much love, Jazzie!
